Friday, 7 September 2018

Scissors

To be honest, all I ever 'properly' learnt sewing from was from primary and secondary school. When I said 'properly', it's really informal. Teacher would never go to teach each student one by one. Probably that's why no one really enjoys sewing. I forgot how I was taught in primary school, but in secondary, teacher just gave you task(s) then expected you to hand in the 'homework' some other day. So yea, we basically just need to try following directions from the textbook. If you manage to figure things out, good for you! Otherwise, let's just nudge our 'neighbour' to help us out! Come to think of it, my mom is definitely a whole lot better teacher. She rarely sew in front of me, unless there's a button going loose or so on, but I know she's the one who has indirectly inspired me to become the person I now am today.

Here are some personal tips and advice on:

- Scissors -

1. Get one
Depending on which hand you use, get the right scissors for yourself. For those left-'handers', if you want to train your right hand, or vice-versa, no one is there to stop you! I never knew left-handed scissors exist until my friend showed it to me. Hmm... Maybe that some day I will try to train my left hand to be as active as my right!

2. Understand it
Only you will know your scissors' 'temper'. So, mine is actually not that sharp since the beginning. Why? Beats me. Ask the stationery shop/manufacturer ;) It cuts papers perfectly well, but not for thinner material like thread or thicker material like felt. Come to think of it, yes I have been told before that I should have a scissors specialized in cloth cutting. I'm fine with the current one now. All I need to do when I'm cutting from felt is to use the part where it's the sharpest. It's somewhere in between the blades!

2. Don't share 
It it's meant for crafts, then let it stays that way. Do not use it to cut food packaging like milo. Otherwise it will become sticky and that's not fun. If you want to cut your hair, find one that's meant for it! Trust me, been there, done that. You won't like your hair style if you use a normal one, unless you want to create your own fashion! For now, I own only one, but in the future, if I'm working on clothes again, I will get that special one!

3. Keep clean
If you cut an area with glue, your scissors most probably will have glue 'stain'. Avoid washing it under water, especially if your scissor is not stainless steel, like mine. A good way to remove glue stain is to rub it off with a rubber :D Other times, just use clean dry soft materials like tissue.

Fun Fact: Since I only have one for my crafts, whenever I misplaced it, it's really a nightmare. I will have to wait for it to come out when the time is right (possibly when my room is less messy)! 

Here's a sneak peak on what I have been working on lately! Enjoy!

Tuesday, 25 July 2017

Miniature Sport Shoe

DISCLAIMERNo Copyright Infringement Intended

A new post almost after a year. It ain't easy managing my time as a student. Now that I have officially graduated, I perceive that I will be even busier once I start to work (which is very soon). 

This is my first (possibly last) attempt in sewing a shoe and these are my 'non-professional', unplanned, random steps that I have used to put it into one piece. Improvisation desperately needed, but I doubt I will make another shoe ;) 

Tutorial 
(For those who prefer pictures in motion, here is the link to youtube. https://youtu.be/qpCS9tKGxos)

1. Get your shoe size right. Which side do you want? Left or right? :D 

2. I believe details are the key to a successful miniature. I am just being lazy, so I went for a simple sort of shoe tread.

3. Sew a strip along the base to give it some thickness. After all, it's a sport shoe, not a slipper.


4. If I did not examine my shoe wrongly, it has two different parts. So, here's to the first front part. 

5. Every shoe has a name/brand/label, doesn't it?

6. My source of inspiration is my Nike shoe, but this word may be too small to be readable. Tips: Just because it's small, it does not mean you have to skip this step! Again, give as much attention to details as possible~

7. Notice the difference? I have added a red backing to it.

8. Now, here comes the second back part of the shoes. To this, I sew a red internal layer as well.

9. So far so good. This is how it would look like once you sew both parts together.

10. I glued a piece of red insole into the shoe, just like how normal shoe would be (and of course to cover some of my thread track :D).

11. Do not underestimate this part of the tutorial. Getting the shoe lace into my hand-made holes took me ages. Trust me, embroidery thread is not the best option, but I have nothing else with me. There's one that I would like to use. However, I do not know what it's called and I do not have any with me.

12. Move on to details. Added some red ridges to this little shoe. I have only an afternoon to make this, but if you have time, definitely should go for sewing, rather than glue-ing.

13. You need to maintain the shape of the shoe, don't you?

14. Final touch. Adding the little 'tick' to the shoe.

15. Front view. 

16. Side view.

17. Top view. 

18. Bottom view.


Source(s) of inspiration:
Idea inspiration: My friend who jogs in the winter.
Design inspiration: My Nike shoe.
Colour inspiration: UK flag (and the limited choices of colour that I have xD)

That's all for now. Hope this inspires you one way or the other.

Friday, 7 October 2016

Lots O Huggin Bear

It's not easy being a full-time student. Now that term has started, there will certainly be less uploads, but one thing for sure, my passion for arts would not die down.

Drumroll please...

As promised, I introduce you to Lots O. One of my favourite bears (next to my green bear - Sam)!


Video on assembling this bear: 
https://youtu.be/WaWj4t-K83c

Till next time!

Thursday, 4 August 2016

Olaf

Helloo arts-loving friends!

I hereby present to you Olaf from Disney Frozen!

2nd piece of merino wool sculpting! Next one (Lots O')! Stay tuned!!


Videos now live on https://youtu.be/vbvlDjooZHw

Saturday, 30 July 2016

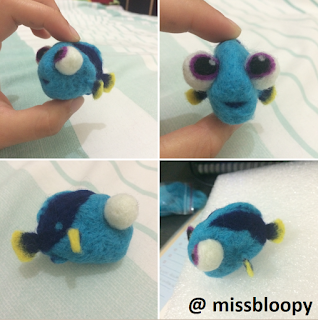
Finding Dory

Hello Peeps! It has been a while (literally) not updating this blog. No, I won't abandon it of course. It costs me my sweat and tears xD.

I love Pixar movies especially the messages from inside the story. Here's one dedicated to baby Dory.

First time trying out felt sculpting and of course more to come!

Video is live on: https://youtu.be/_fIXthvdquo


Wednesday, 20 January 2016

More on IG

Apparently uploading photos onto apps is much faster than onto the website.
Do follow me on insta
https://www.instagram.com/missbloopy/
for exciting creations from my hands :D


Thursday, 16 July 2015

Sandwich

Hungry for sandwich anyone? 

Ahh yes.. Carbohydrates, proteins... We need 'em all!


So, let's see here. Tomatoes, eggs, cheese, vegetables all checked!


Real thing vs the fake sandwich. Hmm.. Which do you prefer? :)

Subscribe to MissBloopy
https://youtu.be/hPooMwkq3ZQ

or

Follow on IG missbloopy